About Me

Your About Me Page….is all about you.  As you get more comfortable with it, it is an opportunity to express who you are, and share the things you like to do. But more so, this is where you can share your growth and experiences at Dr. Charles Best. 

About Me Page

You are going to work through the different steps on your About Me Page, and become more comfortable working with your blog and learning some important skills. Take some risks 🙂 You won’t break anything.

Step 1) To begin editing your About Me Page, click Edit Page, located at the top of the screen. 

Step 2) Familiarize yourself with all of the features on your page, when you are done editing your page, simply press Update on the far right side of the page. You have the ability to add pictures and videos, change fonts, hyperlink etc. 

Step 3) Create a heading on your About Me Page for each of the tasks below. Try each task at your own pace and build your page. 

About Me Page – Tasks

1) Add a Quote: Find your favorite quote, or one that is meaningful to you. Copy and paste it, or type it into your page. Explain why you chose it, and remember to record who said it! Use different fonts and sizes to become comfortable with the tool bar.

2) Add a Video: Find your favorite YouTube clip, add it to your blog.  Explain why you chose it. Add any clips that show some of the amazing things you’ve done. The easiest way to place a YouTube clip on your blog is to find a video you like, copy the URL of the video, and paste the URL exactly where you want it on your page.  

For more detailed information about how to embed click here

3) Add a Picture: Find a picture that you like, dislike, has inspired you or is meaningful to you for some reason. Find a picture that is powerful to you. Insert the picture into your page, and explain why you chose this picture. If you have a picture saved on your computer already, simply go to the Add Media button located on the top of the page, and follow the steps to upload your picture. If you have Googled an image, click on the image, then click the View Image  button, then copy the URL, and either add the URL in the Add Media button or paste it into you blog.

For more detailed information how to insert images click here

4) Add a Hyperlink: Create a hyperlink to a website that is meaningful to you.  Explain why you chose this site. To hyperlink text or pictures to a website, simply high-light the word or select the picture you would like to hyperlink to, then look for the chain link button located in tool bar and click it, then paste the URL in the website area and click Apply.

For more detailed information how to create a hyperlink click here

Customize – Tasks

1) Blog Theme: You are going to personalize your blog. From your Dashboard -> Appearance -> Themes, located on the left hand side of the screen. Choose a theme that is mobile friendly, and apply it. 

For more detailed information how to customize your blog’s Appearance and Theme click here.

2) Blog Appearance: You are going to personalize the appearance of your blog. From your Dashboard -> Appearance -> Customize, located on the left hand side of the screen. 

a) Site Identity – This is where you can edit the title of your blog. Please choose an appropriate title, that does not have both your first and last name in it. You can also edit your tagline. Your tagline is a very short sentence that gives the viewer a snapshot.

b) Colors – Edit the color scheme of your blog.

c) Header Image – This is where you can add and change the picture that is being used in your header.

d) Background Image – This is where you can adjust your background image.

e) Menus – You can create multiple menu structures. For simplicity, lets stick to 1. Make sure you select Menu Location -> Primary Menu -> About Me. Then click Save. This will ensure your menu stays the same, even after adjusting the theme.

f) Widgets – Locate and see all the widgets on your blog.

g) Static Front Page – Front Home Page Display is set to -> Static Page and Front Page is set to -> About Me

Optional – Your First Post: You are now going to create your very first post. At the top of the Dashboard -> New -> Posts.

1) Title – Create a title for your blog post. Your title will be: Things I am Excited About this Year.

2) Body – This is where you place your content of the post – text, videos, pictures, etc. Write a short paragraph about what you are excited about for this upcoming year at Dr. Charles Best. What are some things you want to get involved with? How will you become a part of the Blue Devil community?

3) Tool Bar – In your toolbar you can Add Media and Add Documents into your posts, this is the best way to create visual representations. You can also change fonts, hyperlink, etc.

4) Publish – Here is where you control what items are public and private. You can also control when they are published to your website.

5) Categories – Here is where you choose where you want your post to go. This is your digital binder with all of your subjects. Categorize -> Portfolio.

6) Tags –  Here is where you create tags, these tags can help you find things quicker on your blog and help you stay organised. Tag -> Portfolio.

7) Publish – When you are done! Publish it.


Recent Posts

Week 10 food blog final assessment

Why did you choose to prepare this dish?

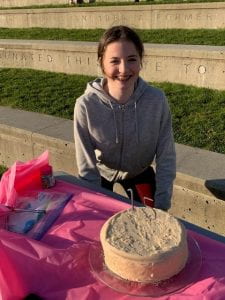
I chose to make this dish for my best friend’s birthday. Since it was my first time making this type of cake.

Is there a story about the dish or recipe?

The story behind this recipe is that I wanted to create something special for my best friend on her birthday. Since we were not allowed to visit anyone in big groups during the first couple of weeks in quarantine, she was not able to have a party. So, then I decided to plan a surprise tail gate party in a parking lot and surprise her with her favorite sweet flavor in cake. She means the world to me and I put 100% of my efforts to making this cake everything that she dreamed of. When I asked her for her favorite sweet flavor, she said maple, so I decided to make her a maple cake with maple frosting. When I surprised her with it she cried and my heart melted. I would love to make more desserts and deliver it to friends and family it just warms my heart at their reactions.

Did you have to make changes to the recipe?

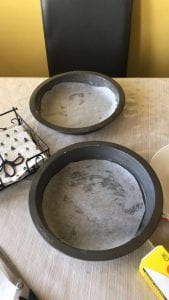
I did not have to make change to the ingredients in this recipe because when baking you must be precise, and I do not think I am experienced enough to experiment and change the recipe around. The only change that I made was with utensils the cake was supposed to be tall and smaller size but I do not own a ton of baking utensils and only had two nine inch pans so I made it bigger and not so tall.

How did everything turn out?

Like Ms. Deck when I make something new, I always ask “Is this a make-again recipe?”  Sometimes the answer is yes, sometimes no! This was a for sure big yes! The cake did not look anything like the image and recipe that I was trying to follow. Although, the way it turned out was very impressive and I am very proud of myself. My family loved this cake because it was simple yet sweet so you could eat a big slice of it without being sick to the stomach. My best friend and her family loved it as well they said it was so good and that they could live off it. I loved this cake a lot, I do not eat cake because I do not really like it but this one was so good, I am totally making this again. The only change I would make it just some added visuals because it looks kind of plain. I could have added some piping work and maybe some added sprinkles to make it a bit more visually appealing.

What did you learn?

One of the skills that I learned from making this maple cake with a maple frosting is how to do a crème coat. The frosting was a maple standard frosting, so it was regular. With the crème coat it must be thin and smooth so you can finish it out with a smooth outer layer. Another skill that I learned is how to cut a cake with string. When layering a cake, you need it to smooth, flush and even so we need to cut it to be precise. When you use a knife it does make more of a jagged edges and when I used the string it made a clean and perfect cut.

Maple Layer Cake
makes one 9-inch round cake

https://e2bakesbrooklyn.com/2018/10/05/maple-layer-cake/

Cake:
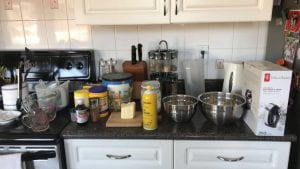
3 cups all-purpose flour
1/3 cup cornstarch
1/4 teaspoon ground cinnamon
1/4 teaspoon ground nutmeg
1 teaspoon baking powder
1/2 teaspoon baking soda
1 teaspoon Kosher or sea salt
1 cup (2 sticks) unsalted butter, melted
2 cups granulated sugar
4 large eggs, room temperature
1/2 cup pure maple syrup
2 teaspoons pure vanilla extract
2 cups buttermilk,* room temperature

Frosting:
1 1/2 cups (3 sticks) unsalted butter, softened to room temperature
4 cups confectioners sugar
1/2 teaspoon Kosher or sea salt
1 teaspoon pure vanilla extract
1/2 cup pure maple syrup
3 tablespoons heavy cream

For Assembly:
1/3 cup pure maple syrup
sparkling sugar (optional)

Preheat oven to 350F. Grease two 9-inch round cake pans. Line with parchment and grease again. Set aside.

In a medium mixing bowl, whisk together flour, cornstarch, cinnamon, nutmeg, baking powder, baking soda, and salt. Set aside.

In a large mixing bowl, whisk together melted butter and granulated sugar. Whisk in eggs one at a time, followed by maple syrup and vanilla. Whisk in half the dry ingredients, followed by half the buttermilk. Add the remaining dry ingredients, followed by remaining buttermilk.

Divide batter evenly between prepared pans. Tap each pan on the counter 5 times to release any large air bubbles. Bake 32-35 minutes, or until a toothpick inserted in the centers comes out clean. Let cakes cool in their pans for 15 minutes. Run a small, think knife around the edges, invert onto racks, and remove parchment. Allow cakes to cool completely.

Make the frosting. In a large mixing bowl, beat butter until light and fluffy, about two minutes. Beat in confectioner’s sugar in two installments, scraping down the bowl as necessary. Beat in salt, followed by vanilla. Beat in maple syrup, followed by heavy cream.

Assemble the cake. Use a serrated knife to slice cake layers equatorially so that you are left with 4 very thin layers. Place one layer, cut-side-up on a serving plate or cake stand. Brush layer with maple syrup. Top with a thin layer of frosting. Top with another thin layer of cake and repeat the brushing and frosting. Repeat layering process one more time. Top with the last remaining thin layer of cake, cut-side-down. Frost cake as desired. Top with sparkling sugar, if using.

Slice and serve. Leftover layer cake will keep covered at room temperature for up to three days, or in the refrigerator for up to a week.

  1. Week 7 food blog Leave a reply
  2. My food blog for Foods 9 (The food) Leave a reply
  3. My food blog for Foods 9 (The utensils and ingredients) Leave a reply
  4. Microbit progress 2 Leave a reply
  5. Microbit progress Leave a reply
  6. TOKTW Promotional Video Leave a reply
  7. My digital footprint Leave a reply
  8. Hello world! Leave a reply